Diferencia entre revisiones de «Quest of the Elements»
| Línea 1: | Línea 1: | ||
| − | == | + | ==Requerimientos== |
| − | * | + | * Acceso Premium, |
| − | * Pokemon | + | * Pokemon con la habilidad "[[Surf]]", ej. [[Goldeen]], |
| − | * Pokemon | + | * Pokemon con la habilidad "[[Fly]]", ej. [[Fearow]], |
| − | * Pokemon | + | * Pokemon con la habilidad "[[Rock Smash]]", ej. [[Geodude]], |
| − | * | + | * Nivel 100, |
| − | * | + | * Jugadores con los pokemons: [[onix]][100+], [[charizard]][100+], [[typhlosion]][100+], [[alakazam]][100+], [[gengar]][100+], [[meganium]][100+], [[jolteon]], [[vaporeon]] y [[flareon]]. |
| − | == | + | ==Camino== |
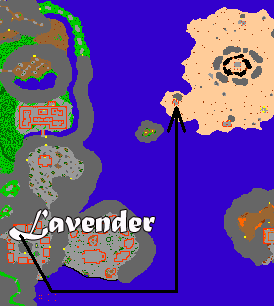
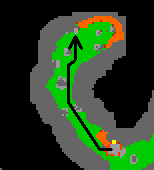
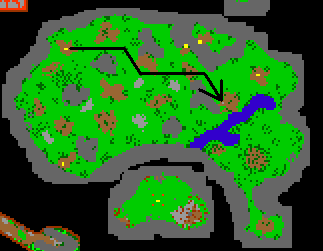
| − | + | Parte de [[Miasta|Lavender]] ve con tu pokemon con "[[Surf]]" o "[[Fly]]" y [[surf|surf]]/[[fly|fly]] hasta donde indica la flecha.<br> | |
[[file:100_0.PNG|link=|center]]<br> | [[file:100_0.PNG|link=|center]]<br> | ||
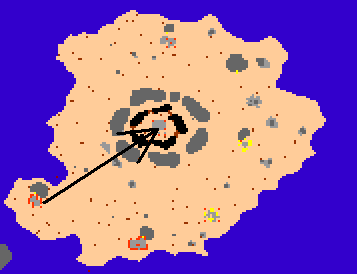
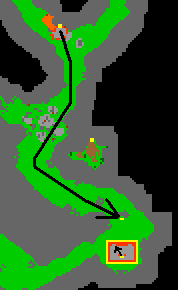
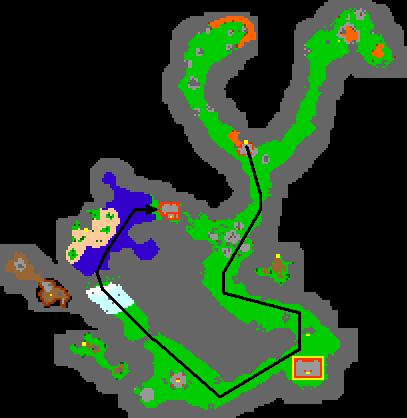
| − | + | Ahora se dividen en dos grupos. Las personas del primer grupo que tienen evoluciones de [[eevee]] van al centro de la isla (al final de la flecha), otros van bajo tierra.<br> | |
[[file:100_1.PNG|link=|center]]<br> | [[file:100_1.PNG|link=|center]]<br> | ||
| − | === | + | ===Primera roca=== |
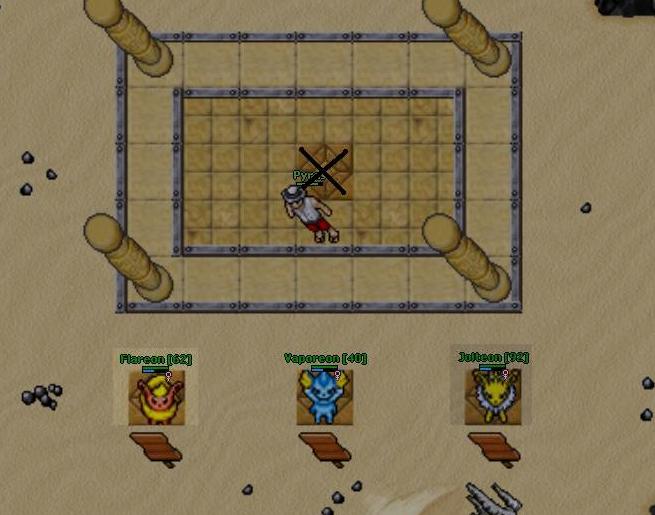
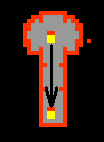
| − | + | El grupo con las evoluciones de [[eevee]] deberán ponerlos como se muestra en la imagen de abajo, luego una persona deberá bajar en el lugar marcado con una X, y pisar la placa para abrir la primer roca. '''Las personas con las evoluciones de eevee, no necesitan ser nivel 100.'''<br> | |
[[file:100_2.JPG|link=|center]]<br> | [[file:100_2.JPG|link=|center]]<br> | ||
| − | === | + | ===Segunda Piedra=== |
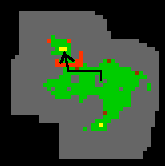
| − | + | Ahora es el momento de desbloquear la segunda roca. Después de bajar a las profundidades, nos dirigiremos al norte, donde atraviesas la puerta y usas Pokémon con habilidad. "[[Rock Smash]]".<br> | |
[[file:100_3.PNG|link=|center]]<br> | [[file:100_3.PNG|link=|center]]<br> | ||
====[[Charizard]]==== | ====[[Charizard]]==== | ||
| − | + | Seguimos la imagen.<br> | |
[[file:100_4.PNG|link=|center]]<br> | [[file:100_4.PNG|link=|center]]<br> | ||
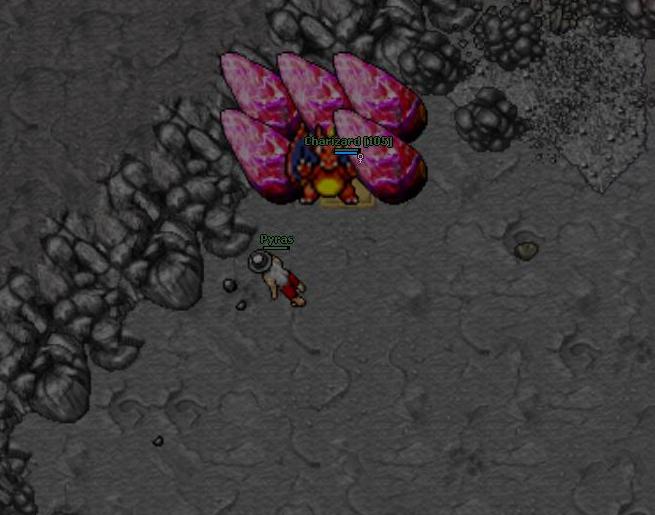
| − | + | Colocas [[charizard|charizard]] en la placa tal como nos muestra la imagen.<br> | |
[[file:100_5.JPG|link=|center]]<br> | [[file:100_5.JPG|link=|center]]<br> | ||
====[[Typhlosion]]==== | ====[[Typhlosion]]==== | ||
| − | + | Seguimos la imagen.<br> | |
[[file:100_6.PNG|link=|center]]<br> | [[file:100_6.PNG|link=|center]]<br> | ||
| − | + | Colocas [[typhlosion|typhlosion]] en la placa tal como nos muestra la imagen.<br> | |
[[file:100_7.JPG|link=|center]]<br> | [[file:100_7.JPG|link=|center]]<br> | ||
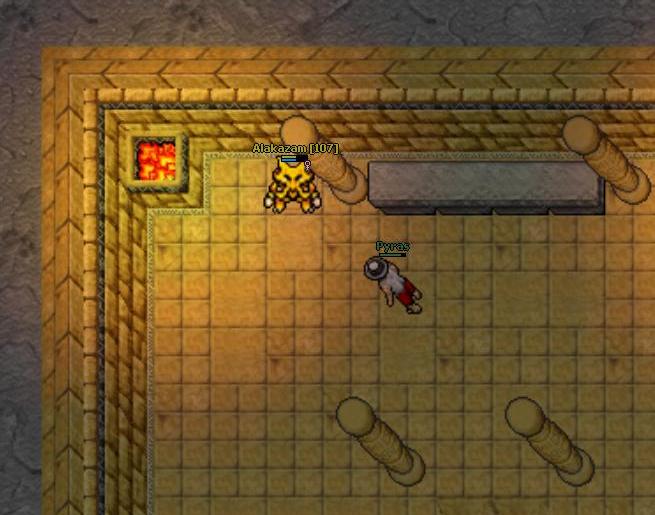
====[[Alakazam]]==== | ====[[Alakazam]]==== | ||
| − | + | Seguimos la imagen.<br> | |
[[file:100_8.PNG|link=|center]]<br> | [[file:100_8.PNG|link=|center]]<br> | ||
[[file:100_9.PNG|link=|center]]<br> | [[file:100_9.PNG|link=|center]]<br> | ||
| − | + | Colocas [[alakazam|alakazam]] en la placa tal como nos muestra la imagen.<br> | |
[[file:100_10.JPG|link=|center]]<br> | [[file:100_10.JPG|link=|center]]<br> | ||
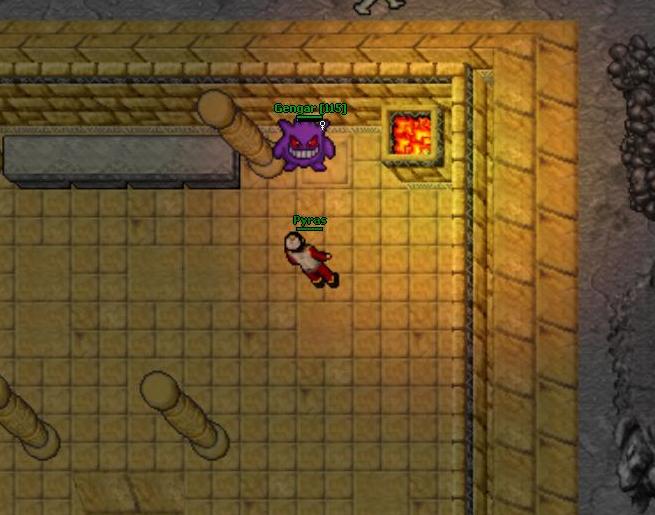
====[[Gengar]]==== | ====[[Gengar]]==== | ||
| − | + | Seguimos la imagen.<br> | |
[[file:100_8.PNG|link=|center]]<br> | [[file:100_8.PNG|link=|center]]<br> | ||
[[file:100_9.PNG|link=|center]]<br> | [[file:100_9.PNG|link=|center]]<br> | ||
| − | + | Colocas [[gengar|gengar]] en la placa tal como nos muestra la imagen.<br> | |
[[file:100_17.JPG|link=|center]]<br> | [[file:100_17.JPG|link=|center]]<br> | ||
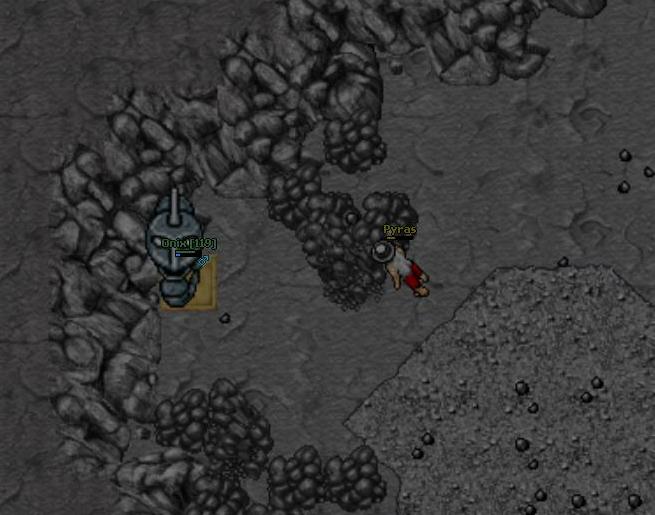
====[[Onix]]==== | ====[[Onix]]==== | ||
| − | + | Seguimos la imagen.<br> | |
[[file:100_11.PNG|link=|center]]<br> | [[file:100_11.PNG|link=|center]]<br> | ||
| − | + | Colocas [[onix|onix]] en la placa tal como nos muestra la imagen.<br> | |
[[file:100_12.JPG|link=|center]]<br> | [[file:100_12.JPG|link=|center]]<br> | ||
====[[Meganium]]==== | ====[[Meganium]]==== | ||
| − | + | Seguimos la imagen, en el camino necesitareemos pokemons con la habilidad "[[Rock Smash]]" and "[[Surf]]".<br> | |
[[file:100_13.PNG|link=|center]]<br> | [[file:100_13.PNG|link=|center]]<br> | ||
[[file:100_14.PNG|link=|center]]<br> | [[file:100_14.PNG|link=|center]]<br> | ||
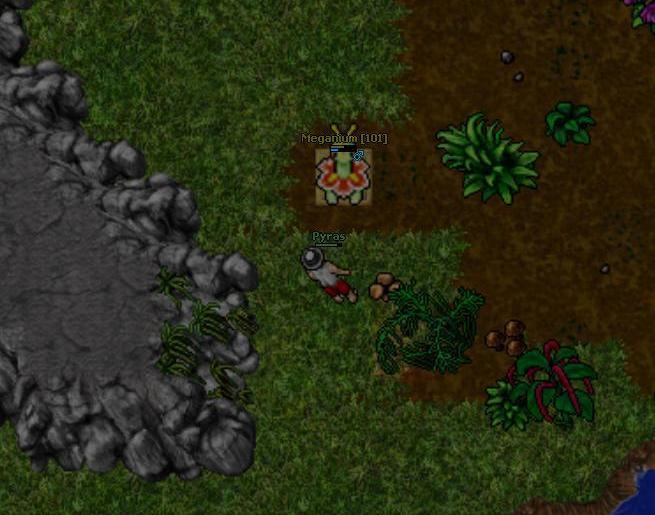
| − | + | Colocas [[meganium]] en la placa tal como nos muestra la imagen.<br> | |
[[file:100_15.JPG|link=|center]]<br> | [[file:100_15.JPG|link=|center]]<br> | ||
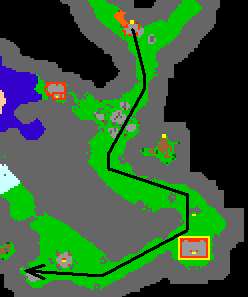
| − | ===Final | + | ===Sala Final=== |
| − | + | Las personas que están haciendo esta misión siguen el mapa, en el camino deberan usar pokemons con la habilidad "[[Rock Smash]]" y "[[Surf]]". Espere pacientemente el momento en que las rocas desaparezcan, vaya al cofre para obtener una recompensa.<br> | |
[[file:100_16.PNG|link=|center]] | [[file:100_16.PNG|link=|center]] | ||
| − | == | + | ==Enemigos== |
[[Abra]], [[Charmeleon]], [[Charizard]], [[Arcanine]], [[Growlithe]], [[Graveler]], [[Golem]], [[Machoke]], [[Machamp]], [[Kadabra]], [[Alakazam]], [[Onix]], [[Dratini]], [[Dragonite]], [[Bulbasaur]], [[Ivysaur]]. | [[Abra]], [[Charmeleon]], [[Charizard]], [[Arcanine]], [[Growlithe]], [[Graveler]], [[Golem]], [[Machoke]], [[Machamp]], [[Kadabra]], [[Alakazam]], [[Onix]], [[Dratini]], [[Dragonite]], [[Bulbasaur]], [[Ivysaur]]. | ||
| − | == | + | ==Recompensas== |
| − | * | + | * Usar y subir pokemons a nivel 130. |
==Tips== | ==Tips== | ||
| − | * | + | * Puedes usar las versiones cloned de los pokemons. |
| − | * | + | * Abra la primera roca y bloquéela posicionándose en su lugar, luego bloquee la segunda. |
| − | * | + | * Cuida la primera roca y luego la segunda. |
| − | * | + | * Lleva un pokemon con la habilidad "[[Teleport]]", para que no tengas problemas al salir de la habitación. |
Revisión del 03:10 27 ago 2019
Contenido
Requerimientos
- Acceso Premium,
- Pokemon con la habilidad "Surf", ej. Goldeen,
- Pokemon con la habilidad "Fly", ej. Fearow,
- Pokemon con la habilidad "Rock Smash", ej. Geodude,
- Nivel 100,
- Jugadores con los pokemons: onix[100+], charizard[100+], typhlosion[100+], alakazam[100+], gengar[100+], meganium[100+], jolteon, vaporeon y flareon.
Camino
Parte de Lavender ve con tu pokemon con "Surf" o "Fly" y surf/fly hasta donde indica la flecha.
Ahora se dividen en dos grupos. Las personas del primer grupo que tienen evoluciones de eevee van al centro de la isla (al final de la flecha), otros van bajo tierra.
Primera roca
El grupo con las evoluciones de eevee deberán ponerlos como se muestra en la imagen de abajo, luego una persona deberá bajar en el lugar marcado con una X, y pisar la placa para abrir la primer roca. Las personas con las evoluciones de eevee, no necesitan ser nivel 100.
Segunda Piedra
Ahora es el momento de desbloquear la segunda roca. Después de bajar a las profundidades, nos dirigiremos al norte, donde atraviesas la puerta y usas Pokémon con habilidad. "Rock Smash".
Charizard
Seguimos la imagen.
Colocas charizard en la placa tal como nos muestra la imagen.
Typhlosion
Seguimos la imagen.

Colocas typhlosion en la placa tal como nos muestra la imagen.

Alakazam
Seguimos la imagen.
Colocas alakazam en la placa tal como nos muestra la imagen.
Gengar
Seguimos la imagen.
Colocas gengar en la placa tal como nos muestra la imagen.
Onix
Seguimos la imagen.
Colocas onix en la placa tal como nos muestra la imagen.
Meganium
Seguimos la imagen, en el camino necesitareemos pokemons con la habilidad "Rock Smash" and "Surf".

Colocas meganium en la placa tal como nos muestra la imagen.
Sala Final
Las personas que están haciendo esta misión siguen el mapa, en el camino deberan usar pokemons con la habilidad "Rock Smash" y "Surf". Espere pacientemente el momento en que las rocas desaparezcan, vaya al cofre para obtener una recompensa.
Enemigos
Abra, Charmeleon, Charizard, Arcanine, Growlithe, Graveler, Golem, Machoke, Machamp, Kadabra, Alakazam, Onix, Dratini, Dragonite, Bulbasaur, Ivysaur.
Recompensas
- Usar y subir pokemons a nivel 130.
Tips
- Puedes usar las versiones cloned de los pokemons.
- Abra la primera roca y bloquéela posicionándose en su lugar, luego bloquee la segunda.
- Cuida la primera roca y luego la segunda.
- Lleva un pokemon con la habilidad "Teleport", para que no tengas problemas al salir de la habitación.